
For optimal refreshment, placing your chilled beverage in the cold compartment for approximately 30 minutes is advisable. This timeframe strikes a balance between achieving the desired temperature and avoiding any risk of freezing. Planning ahead can spare you from the disappointment of a frosty bottle.
If you’re in a hurry, a quicker option is to submerge the bottle in a combination of ice and water for about 10 to 15 minutes. This method enhances the cooling process significantly, ensuring a delightful experience without the dangers of ice crystals forming inside the bottle.
Always keep an eye on the time. Leaving it unattended for too long can lead to an unwelcome surprise. A perfectly cooled drink can elevate your dining experience, making it all the more enjoyable. Cheers to making informed choices in your beverage service!
Chilling Time for Refreshing Whites
To achieve an optimal temperature for your chilled beverages, place the bottles in the cold compartment for about 30 minutes. This duration effectively lowers the temperature without risking freezing. Aim for a final serving temperature of around 45-50°F (7-10°C).

Steps to Ensure Perfect Cooling
- Wrap the bottle in a damp cloth for enhanced heat absorption.
- Check the temperature periodically to avoid overcooling.
- Consider placing the bottle in an ice-water mixture if time is tight.
After 30 minutes, the beverage will be adequately refreshed, providing a crisp and enjoyable experience. Always remember to serve immediately to enjoy the full bouquet of flavors.
Understanding the Ideal Serving Temperature for White Wine
The optimal temperature for serving refreshing beverages typically falls between 45°F and 55°F (7°C to 13°C). This range allows the subtle aromas and flavors to emerge without being masked by excessive chill. For lighter varieties like Sauvignon Blanc or Pinot Grigio, aim for the lower end of this spectrum, while fuller-bodied options such as Chardonnay can benefit from slightly warmer conditions.
To achieve the desired temperature, consider the method of cooling. A quick method involves placing the bottle in an ice bath with equal parts water and ice for about 15-20 minutes. Alternatively, if you prefer a more gradual approach, storing bottles in the refrigerator for a few hours before serving is effective.
Be mindful of the serving vessel as well; using a narrower glass can help retain the desired temperature for longer. Avoid pouring excessively large portions, as this can lead to quicker warming. Instead, serve smaller amounts to maintain the ideal drinking experience.
Understanding the nuances of temperature can significantly enhance enjoyment, unlocking the full potential of the beverage. Experimenting with different varieties at various temperatures can be an enlightening experience, enabling a deeper appreciation for the intricacies of each selection.
Factors Influencing Chilling Time in the Freezer
Several elements determine the duration needed to cool your beverage effectively. Understanding these can significantly enhance your experience with chilled drinks.
Initial Temperature of the Bottle
The starting temperature plays a crucial role. If the bottle is at room temperature (around 70°F), it will take longer to reach the desired coolness compared to a bottle that has been stored in a cooler environment. A bottle directly from a refrigerator will require less time.
Freezer Temperature and Air Circulation
The efficiency of your appliance affects chilling outcomes. A standard freezer typically operates at 0°F, but variations exist. Ensuring good air circulation within the unit can expedite the process. If the bottle is placed in a crowded freezer, it may take longer due to restricted airflow.
| Factor | Impact on Chilling Time |
|---|---|
| Initial Bottle Temperature | Higher starting temps increase chilling duration |
| Freezer Temperature | Colder settings reduce time required |
| Air Circulation | Better circulation equals quicker cooling |
| Packaging | Thinner bottles cool faster than thicker |
By considering these factors, you can achieve optimal results and enjoy your favorite selections at the perfect temperature.
Step-by-Step Guide to Chilling White Wine Quickly
For optimal results, follow these precise steps to bring your chilled beverage to the perfect temperature in minimal time.
1. Prepare Your Materials: Gather a large bowl or bucket, ice, and salt. This combination is more effective than just ice alone.
2. Fill the Container: Place a generous amount of ice in your bowl or bucket, filling it halfway. Add cold water until the ice is submerged.
3. Add Salt: Sprinkle a handful of salt over the ice and water mixture. This will lower the freezing point of the water, allowing for faster cooling.
4. Submerge the Bottle: Insert your bottle into the ice-water-salt mixture, ensuring that the liquid reaches the neck of the bottle. Make sure it is well supported and does not tip over.
5. Wait: Allow the bottle to sit for about 15 minutes. This method typically results in a temperature drop to around 45°F (7°C).
6. Check Temperature: Use a wine thermometer or simply touch the bottle to gauge its chill. If it’s not cold enough, give it a few more minutes.
7. Serve: Once at the desired temperature, remove the bottle and dry it off to prevent water drips on the serving area.
This method is efficient and guarantees a refreshing experience without the worry of overcooling or freezing. Enjoy your perfectly tempered drink!
Common Mistakes When Chilling Wine in the Freezer
One frequent error is overestimating the time needed to cool. Leaving a bottle in for too long can lead to a frozen product, resulting in a burst bottle or a mess. Aim for a maximum of 30 minutes.
Another common issue is not using a timer. Forgetting the bottle is easy, and losing track of time can ruin your beverage. Always set a timer to avoid surprises.
Using the wrong container can also be problematic. A bottle placed in a plastic bag may not cool evenly. Opt for a more stable surface to ensure consistent temperature distribution.
Some individuals fail to account for the initial temperature of the liquid. A bottle taken from a warm environment will require more time than one stored in a cool place, so adjust accordingly.
Lastly, neglecting to rotate the bottle can lead to uneven cooling. Occasionally turning the bottle ensures that all parts reach the desired temperature uniformly.
- Limit the cooling time to 30 minutes.
- Always use a timer.
- Choose a stable container for cooling.
- Consider the starting temperature of the beverage.
- Rotate the bottle for even cooling.
Signs That Your Beverage Is Perfectly Chilled
Look for condensation on the bottle. This indicates that the temperature is ideal, as moisture forms when the surface cools. A well-cooled drink will also feel pleasantly cold to the touch, which is a good sign of proper cooling.
Check the pouring consistency; a perfectly chilled liquid should flow smoothly without excessive froth. A slight resistance when pouring may suggest it’s still too warm.
The aroma should be fresh and vibrant, with the fruit notes expressed clearly. If the bouquet is muted or overly alcoholic, it’s likely at an unsuitable temperature.
When tasting, the balance of flavors should be harmonious. A too-warm drink might taste overly sweet or harsh, while a well-cooled option will have a crisp and refreshing finish.
Lastly, consider the aftertaste. A well-cooled beverage leaves a clean, refreshing finish, inviting you back for more. If it feels heavy or cloying, it may need more time in the cooling environment.
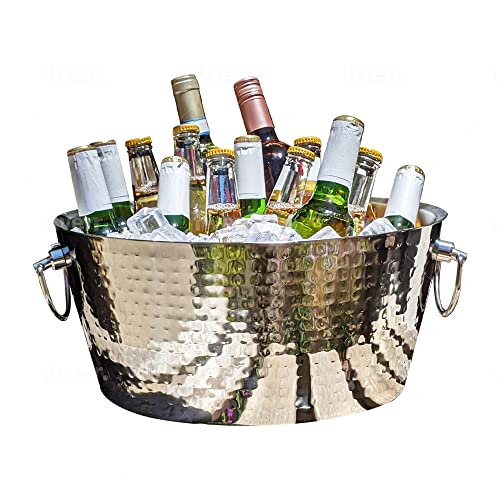
Alternatives to Freezing for Chilling White Wine
For those short on time, consider using an ice bucket filled with a mix of water and ice. This method enhances the cooling process significantly, as the water surrounds the bottle, allowing for better thermal conductivity. Aim for a 1:1 ratio of ice to water for optimal results.
Another efficient technique involves placing the bottle in a bowl of saltwater. Adding salt lowers the freezing point of water, enabling the mixture to absorb heat more effectively. This can reduce the cooling time to around 15-20 minutes.
Chilling Wraps and Gel Packs
Utilizing specialized chilling sleeves or gel packs can also expedite the process. Simply freeze the sleeve beforehand and wrap it around the bottle. This method is convenient and can chill your beverage within 20-30 minutes.
Quick Refrigerator Techniques
If you have a bit more time, placing the bottle in the fridge for a minimum of 30 minutes will achieve a pleasant temperature. You can also pre-chill your glasses to enhance the overall experience. For a unique twist, consider using frozen grapes as ice cubes; they provide a visually appealing and functional solution.
For those with interests beyond wine, you can explore various topics like how to cycle a fish tank quickly to expand your knowledge base.
What to Do If You’ve Left Wine in the Freezer Too Long
Remove the bottle immediately to prevent further damage. If the liquid has expanded and the cork is pushed out or broken, assess the situation carefully. Pour out any wine that has leaked and check for signs of freezing or slushiness.
If the contents are still mostly liquid, give them a gentle swirl to mix any ice crystals that may have formed. Allow it to sit at room temperature for a few minutes before tasting. This will help restore some balance.
In cases where the beverage has completely frozen, you may need to let it thaw gradually in the refrigerator. Avoid using heat sources, as they can affect the flavor profile.
Once thawed, sample a small amount to determine its quality. If it tastes off or has changed significantly, it may be best to discard it. Remember, not all bottles are created equal, and some may handle temperature swings better than others.
In the future, consider using a timer or reminder to keep track of chilling times. This can help avoid the frustration of a frozen bottle and ensure optimal enjoyment of your favorite beverages.