

Begin with a steady grip on the base of the vessel. A firm hold is essential to maintain stability as you prepare for the next step.
Next, take a waiter’s corkscrew and position the spiral at the center of the cork. Apply gentle pressure while twisting the handle clockwise, ensuring the spiral penetrates deep enough without damaging the closure.
As you continue to twist, keep a close eye on the cork. Once you feel resistance, it’s time to pull slowly and evenly. This method will help minimize any unwanted crumbling of the cork, preserving the integrity of your cherished liquid.

For those using a different type of closure, such as a screw cap, simply apply a firm twist in the opposite direction until you hear the satisfying click that indicates it’s released.
Enjoy the process and the anticipation of the delightful flavors awaiting you. Cheers to a successful release!
Efficiently Removing the Closure from a Stella Rosa Container
To effectively detach the closure from a Stella Rosa container, utilize a simple yet precise method. Start by ensuring the container is on a stable surface. Grip the neck firmly, preventing any slipping.
Steps to Follow
- Locate the foil capsule at the top. Use a foil cutter or a sharp knife to remove it cleanly.
- Once the foil is removed, grasp the cork with a corkscrew designed for natural corks. Insert the screw into the center of the cork, twisting it in until only one spiral is visible.
- Pull the cork gently but steadily. If resistance is met, wiggle the cork slightly to ease it out.
Tips for a Smooth Experience
- Maintain a straight pull on the cork to prevent breakage.
- For added control, consider using a two-pronged cork puller.
- Serve the beverage immediately after removal for the best experience.
Pairing this delightful beverage with a meal is a great way to enhance your enjoyment. If you’re looking for culinary inspiration, check out this guide on how to cook lamb steaks in ninja air fryer.
Choosing the Right Tool for Opening
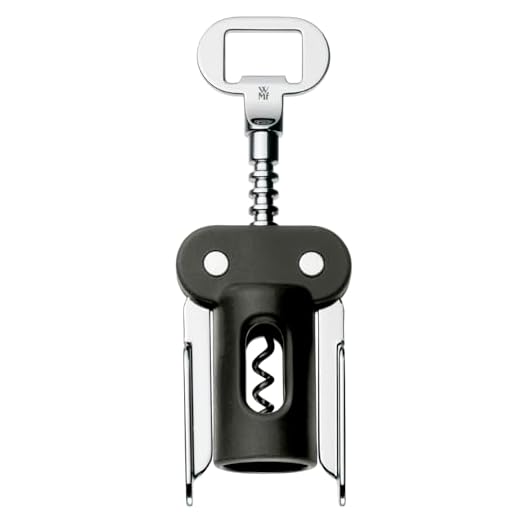
The ideal choice for accessing your favorite liquid is a corkscrew, specifically a waiter’s corkscrew or a winged corkscrew. Both offer distinct advantages based on your comfort level and experience.
A waiter’s corkscrew is compact and practical. It features a small blade for cutting foil and a lever that provides leverage, making extraction effortless. Practice using it to develop a smooth technique.
A winged corkscrew, on the other hand, is user-friendly. Its design allows you to simply twist the handle until the wings rise, indicating the cork is ready to be pulled. For beginners, this tool minimizes the risk of breaking the cork or damaging the closure.
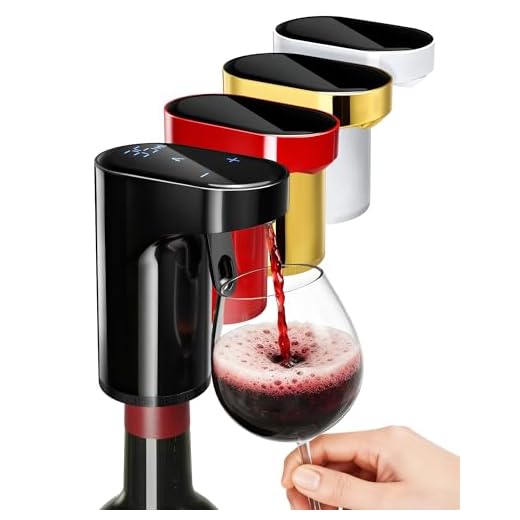
If you prefer a modern approach, consider an electric opener. This tool requires minimal effort, making it an excellent option for those who might struggle with manual methods.
Regardless of the tool selected, ensure it is clean and in good condition before use. A well-maintained corkscrew enhances the overall experience and allows for a smooth uncorking process.
Removing the Foil Capsule Properly
To effectively remove the foil capsule, begin by positioning the bottle securely on a flat surface. This stability is key in avoiding any mishaps during the process.
Utilize a foil cutter or a sharp knife for precision. If you’re using a knife, hold the blade at a slight angle to the neck of the container, which ensures a clean cut. Make a circular incision around the neck, just below the lip, to detach the foil without leaving any residue.
Steps for Effective Foil Removal
- Secure the container on a stable surface.
- Choose an appropriate tool–a foil cutter or a sharp knife.
- Make a circular cut around the neck, just below the lip.
- Peel away the foil, disposing of it responsibly.
After removing the capsule, inspect the neck for any remaining foil pieces, as they can interfere with pouring. This attention to detail ensures a smooth and enjoyable experience when serving.
Using a Corkscrew for Stella Rosa Bottles
Select a reliable corkscrew, preferably a two-step model, as it provides better leverage for removing the cork. Ensure the spiral is sharp and long enough to penetrate deeply into the cork.
Position the corkscrew’s spiral in the center of the cork, applying slight pressure to avoid slipping. Twist the handle clockwise until the spiral is fully inserted, generally about three-quarters of the way in. This ensures a secure grip on the cork.
Next, use the first lever of the corkscrew to pull the cork halfway out. This step is crucial for maintaining control over the cork. Once it’s halfway extracted, switch to the second lever to ease the cork out completely. This method minimizes the risk of breaking the cork, which can lead to unwanted fragments.
If the cork is particularly stubborn, gently wiggle the corkscrew while pulling upward. This motion can help dislodge any resistance, making it easier to release the cork without damaging it.
After removal, inspect the cork for any signs of damage. A clean cork indicates proper storage and handling, which is essential for preserving the integrity of the product.
Store the cork properly in case you need to re-seal the container. This step is especially useful if you won’t finish the contents in one sitting, helping to maintain freshness.
Avoiding Cork Breakage During Opening
Maintain a steady grip on the cork while twisting the corkscrew. This reduces the risk of snapping the cork, especially with older or fragile closures. If the cork feels resistant, pause and wiggle the corkscrew gently to loosen it before proceeding.
Consider using a two-pronged cork puller, also known as an Ah-So. This tool slides between the cork and the neck, allowing for a gentle extraction without putting pressure on the cork itself. It’s particularly effective for older bottles, where traditional corkscrews may struggle.
Temperature Matters
Before attempting to remove the closure, ensure the bottle has been properly chilled. A warm environment can cause the cork to expand and become brittle. Allowing the bottle to rest in a cool place prior to service can help maintain the integrity of the cork.
Inspect the Cork
Before removal, take a moment to examine the cork for any signs of damage, such as cracks or dryness. If the cork appears compromised, consider using a wine filter or funnel to strain any cork particles that may fall into the liquid during extraction.
Pouring Techniques for Optimal Enjoyment
Begin with a clean glass to ensure the purity of the flavor. Hold the glass by the stem to avoid warming the liquid with your hand.
Pour slowly, aiming for the center of the glass. This minimizes splashing and allows for a gentle aeration, enhancing the bouquet. A 5-ounce pour is standard for tasting; larger servings can be reserved for casual enjoyment.
As you pour, tilt the glass slightly. This increases the surface area and helps release the aromas. The angle also ensures that the liquid glides down the inside of the glass, preventing excessive foaming.
Stop pouring when the liquid reaches the widest part of the glass. This provides ample space for the aromas to concentrate, elevating the overall experience.
For sparkling varieties, pour at a steeper angle to control the bubbles. Allow time for the fizz to settle before continuing to pour, which helps maintain the effervescence and flavor integrity.
Always serve at the appropriate temperature. Chilled varieties should be kept in an ice bucket for easy access, while room-temperature selections benefit from brief cooling before service.
Finally, when serving multiple individuals, pour for guests first before filling your own glass. This not only demonstrates hospitality but also enhances the enjoyment for everyone involved.
Storing Opened Stella Rosa Safely
Keep your opened bottle in the refrigerator. The cool temperature helps preserve the flavors and aromas, extending its shelf life.
Use a wine stopper for a tight seal. This minimizes air exposure, which can lead to oxidation and spoilage. A vacuum pump can further enhance preservation by removing air from the container.
Store the bottle upright. This prevents the cork from becoming overly saturated and potentially crumbling, which can contaminate the liquid.
Avoid direct sunlight and heat. Place the bottle in a dark, cool place to maintain its quality. A wine fridge is ideal, but a regular refrigerator works well too.
Consume within a few days to a week for the best experience. While some wines can last longer, the flavors in opened sweet wines tend to diminish over time.
Consider labeling the bottle with the opening date. This way, you can keep track of its freshness and enjoy it at its peak.
FAQ:
What are the steps to open a Stella Rosa wine bottle safely?
To open a Stella Rosa wine bottle, first, ensure you have a corkscrew or a wine opener ready. Hold the bottle firmly at the base with one hand. With the other hand, remove any foil or seal covering the cork by cutting it around the top. Next, insert the corkscrew into the center of the cork and twist it down until the spiral is fully embedded. After that, gently pull the cork upwards while stabilizing the bottle. Once the cork is removed, you can pour the wine into glasses. Remember to serve it chilled for the best flavor.
Are there any tips for avoiding cork breakage when opening a Stella Rosa wine bottle?
To minimize the risk of cork breakage when opening a Stella Rosa wine bottle, it’s essential to use a high-quality corkscrew designed for ease of use. Before inserting the screw, ensure the cork is not too dry; if it is, consider gently warming the bottle in your hands. When you insert the corkscrew, aim for the center of the cork and use a slow, steady twisting motion. Avoid pulling too hard too quickly; instead, apply even pressure as you extract the cork. If the cork starts to crumble, use a two-pronged cork extractor if you have one, as it can help remove stubborn pieces without damaging the bottle.


